This is a project I learned about from the fantastic Dreamcastic YouTube channel. It’s a Pi Pico device that loaded with custom firmware, acts as an interface between the Dreamcast and various USB devices. We’re talking PS3 controllers, PS4, Xbox 360, certain joysticks, certain racing wheels, and your own mouse and keyboard’s.
I’m working on making a video of my process of building it but for now I just wanted to drop a brief introduction, and my thoughts of it so far.
For starters, it’s not entirely beginner friendly. If you’re familiar with a soldering iron, you should be fine. But, as I learned the hard way, soldering something this tiny is difficult. I will definitely be working on a do-over soon, which is why my first hour long video of me fumbling about with it will never see the light of day.
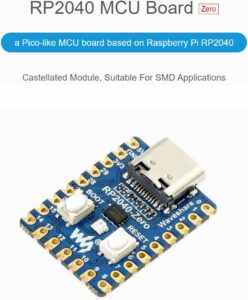
The device itself is fairly simple, and is readily available on Amazon for around $10. The other things you’ll need is a USB-C to A adapter, a USB-C cable to program the device with the custom firmware, and either a broken controller to donate a cable from, or one of those cable extenders you’re willing to part with.
I opted for using the cable from a Dreamcast controller, which really hurt me. It was easier however, since my multimeter would fit in the male connector to trace the pin outs, and I couldn’t find a reliable wiring diagram for the extension cable.
I followed the instructions from the wiki, but will be putting my own notes and experience in as well. You’ll want to visit this page regularly however, it has the instructions for the flash process, and will have the latest firmware available.
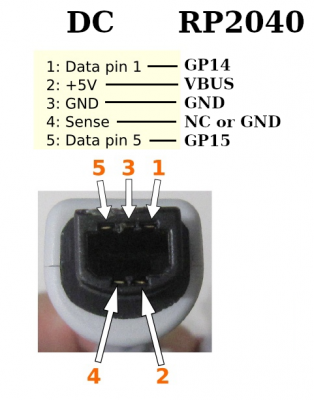
Above is the image from the Wiki. It had me a bit confused at first, but everything started to make more sense once I found pics of someone else’s completed build. Which I want to clear up here a little bit to help others in need. This is at your own risk of course.
- Orange – Pin 14
- Green – Pin 5V
- White – Ground
- Blue – Not used? I didn’t.
- Red – Pin 15
I may have 3 and 4 reversed. But wire the white cable to Ground on the board. For my build, I did not use the blue wire and just cut it off. If this is a mistake or not, I’ve yet to determine, but so far it has worked fine without it.
So far, the only device I’ve tested with it has been a Microsoft Optical Mouse. This has mostly been the only thing I’ve been interested in trying however, my main reason for doing this project was to skip using the awful old school Dreamcast ball mouse.
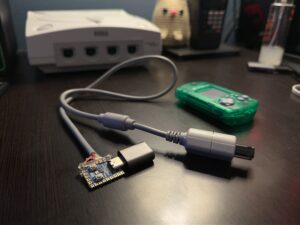
I went nuts with hot glue on mine to ensure that the cables don’t move around too much and hopefully won’t come loose. Version 2 that I’ll work on soon should be put together far better than this.